
Difficulty: Easy Time: 10 minutes Tools Required: None Skill Level: Beginner
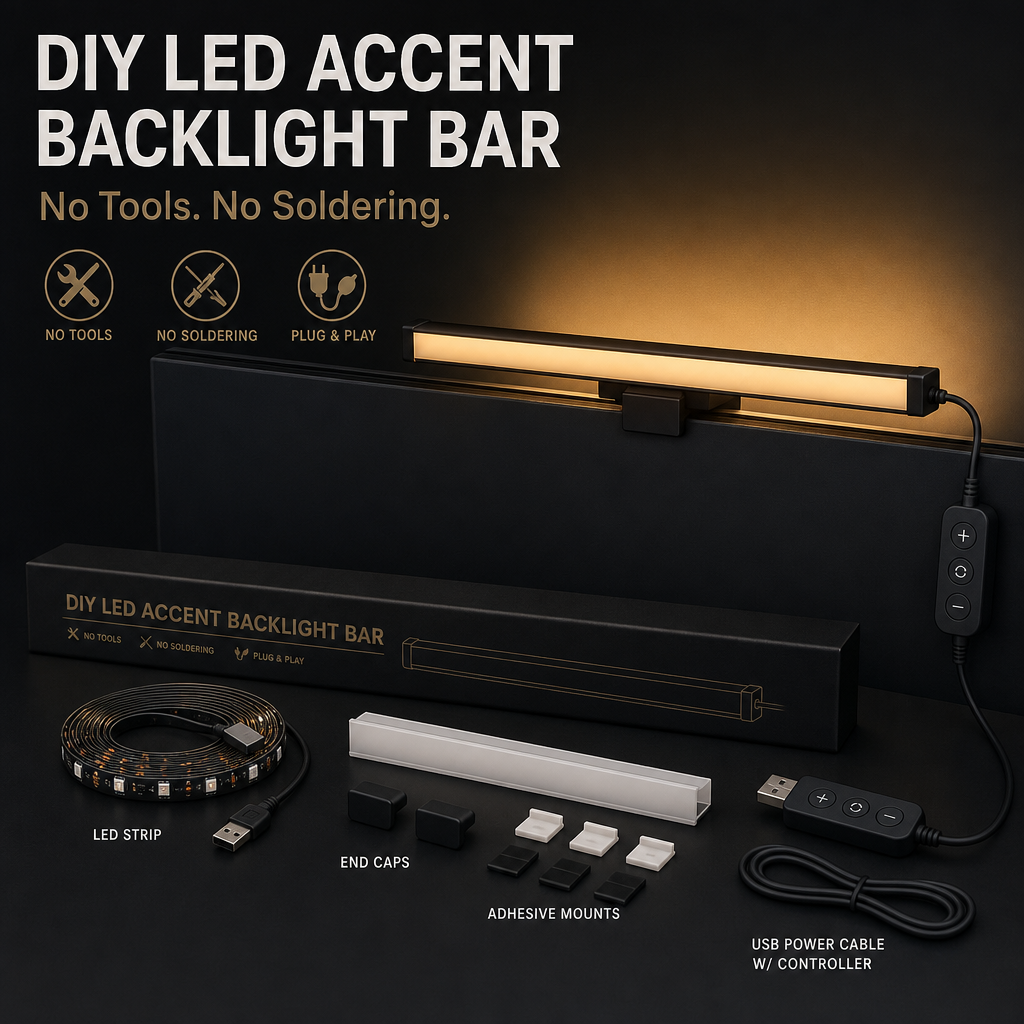
This project creates a clean, modern LED accent backlight bar using real parts from Amazon, with zero tools, zero soldering, and zero cutting. Perfect for desks, shelves, TVs, or gaming setups.
Quick Options
Pick the version that fits your style:
- Premium: Add a diffuser for soft, pro‑looking light
- Simple: Stick the LED strip directly to a bar → done
- Weighted: Add a base if you want it to stand upright
Quick Build Summary
- Choose a wooden, plastic, or aluminum bar (or use a premade one).
- Stick the LED strip along the back, top, or underside.
- Add a weighted base if you want it to stand upright.
- Plug into USB power.
- Adjust brightness and color to match your setup.
Overview
This Workshop Project shows you how to turn a cheap LED strip into a clean, modern accent light bar. It works great behind monitors, under shelves, behind controllers, or as a soft glow behind figures.
No tools, no soldering, no wiring — just stick, plug, and glow.
Works with:
- Smart LED strips
- RGB LED strips
- Warm white strips
- USB‑powered strips
What You’ll Need
- LED strip (USB or 5V recommended)
- Bar or rod (wood, plastic, metal — anything straight)
- Double‑sided tape or nano tape
- Optional: diffuser cover
- Optional: weighted base
- Optional: cable clips
Everything here is cheap and easy to find at Walmart, Amazon, Dollar Tree, or hardware stores.

Step-by-Step Build
1. Choose Your Bar
Pick something straight and clean:
- Wooden trim
- Plastic molding
- Aluminum bar
- Even a leftover shelf edge
Length: 8–16 inches works best.
2. Attach the LED Strip
Peel the adhesive backing and stick the LED strip:
- Along the back for indirect glow
- Along the bottom for under‑glow
- Along the top for wall wash
Press firmly so it bonds well.
3. Add a Weighted Base (Optional)
If you want it to stand upright:
- Use a small block of wood
- Use a magnetic camera base
- Use a figure stand
- Use nano tape under the bar
This keeps it stable and clean.
4. Add a Diffuser (Optional)
For a premium look:
- Snap‑on LED diffuser
- Frosted plastic tube
- Translucent acrylic strip
This softens the light and hides the LEDs.
5. Plug It In
Use:
- USB port on your monitor
- USB hub
- Power bank
- Wall adapter
Adjust brightness and color to match your setup.
LED Strip Options

Great for simple builds, cheap, bright, and easy to power.
Diffuser Covers

Makes the light look soft and professional.
Weighted Bases

Perfect for standing the bar upright.
Nano Tape

Keeps everything stable without screws.
Mounting the Light Bar
This is where the build becomes clean and stable.
Option A: Nano Tape
- Cut a small strip.
- Stick it to the bottom of the bar.
- Press onto your desk or shelf.
- Done.
Option B: Weighted Base
- Glue or tape the bar to the base.
- Center it so it doesn’t lean.
- Add cable clips behind the base.
Optional Upgrades
- Add a smart LED strip for voice control
- Add a diffuser for soft glow
- Add a second bar for symmetry
- Add a USB switch for easy on/off
Where This Fits in Your Setup
This light bar works great behind monitors, under shelves, behind controller displays, or next to figures. It adds depth, glow, and a clean modern look.
Wrap-Up
A simple, cheap, and clean lighting upgrade that instantly improves your setup. Build one in minutes — or make a matching pair for a pro look.