
Difficulty: Easy Time: 5–10 minutes Tools Required: None Skill Level: Beginner
A clean, modern headset hanger you can mount anywhere — no screws, no drilling, no tools. Perfect for desks, shelves, gaming setups, or workstations.

Quick Options
Pick the version that fits your setup:
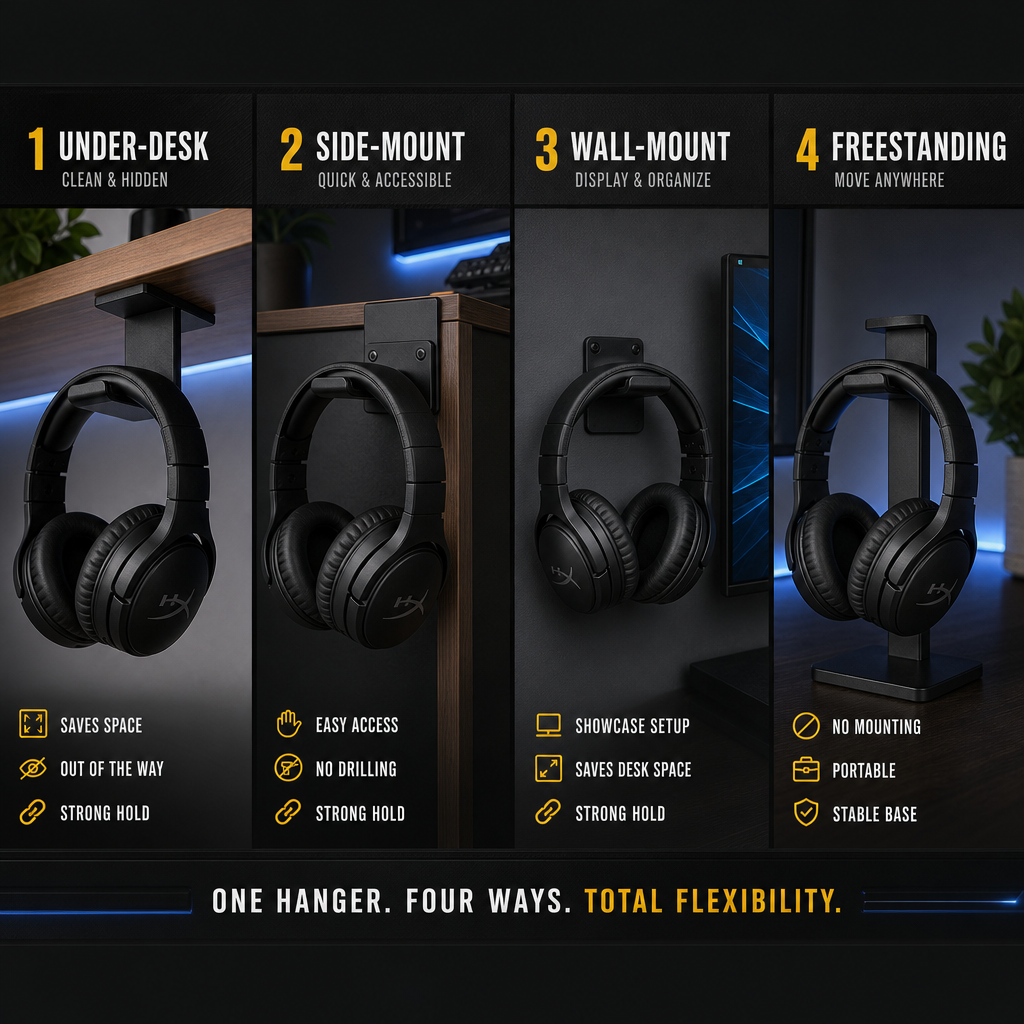
- Weighted Base: Turns into a freestanding headphone stand
- Under‑Desk: Hidden, clean, and space‑saving
- Side‑Mount: Easy access and display‑friendly
- Wall‑Mount: Works with nano tape or adhesive pads
Quick Build Summary
- Choose your mounting style (under‑desk, side‑mount, wall, or freestanding).
- Clean the surface so the adhesive sticks properly.
- Apply nano tape or adhesive pads to the hanger.
- Press firmly for 10–20 seconds.
- Hang your headset and adjust the angle if needed.
Overview
This Workshop Project shows you how to build a simple, clean headset hanger using inexpensive materials and zero tools. It works with gaming headsets, studio headphones, wireless headsets, and lightweight VR headsets.
No screws, no drilling, no damage — just stick, mount, and hang.
Works with:
- Weighted bases
- Plastic hangers
- Metal hooks
- 3D‑printed hangers
- Adhesive‑backed hooks
What You’ll Need
- Headset hanger (plastic, metal, or adhesive hook)
- Nano tape or strong double‑sided adhesive
- Optional: rubber bumpers for grip
- Optional: cable clip for headset wire
- Optional: weighted base (for freestanding version)
Everything here is cheap and easy to find at Walmart, Amazon, Dollar Tree, or hardware stores.
Step-by-Step Build
1. Choose Your Mounting Style
Pick the style that fits your desk:
- Under‑desk: Hidden and clean
- Side‑mount: Easy access
- Wall‑mount: Great for display
- Freestanding: No mounting needed
2. Prep the Surface
Clean the mounting area with:
- Rubbing alcohol
- A microfiber cloth
This removes dust and oils so the adhesive sticks properly.
3. Add Grip (Optional)
If your hanger is smooth plastic, add:
- Rubber bumpers
- Silicone pads
This prevents your headset from sliding.
4. Apply Nano Tape or Adhesive
Flip the hanger over and apply:
- One long strip for under‑desk
- Two small strips for side‑mount
- Full coverage for wall‑mount
Press the tape firmly onto the hanger.
5. Mount the Hanger
Peel the protective film and press the hanger onto your surface:
- Hold for 10–20 seconds
- Make sure it’s straight
- Check that it doesn’t wiggle
Nano tape bonds stronger over the next few hours.
6. Hang Your Headset
Place your headset on the hanger and check:
- Balance
- Angle
- Clearance
- Cable routing
If needed, adjust the hanger slightly before the adhesive fully cures.


Premade Controller Holders

Clean, simple, and perfect for side‑mount setups. These hangers require zero tools and hold most gaming or studio headsets securely.
Headset Hanger Options

Clean, simple, and perfect for under‑desk setups. These adhesive hangers require zero tools and hold most gaming or studio headsets securely.
Weighted Base (Freestanding Option)

Turn your hanger into a freestanding headphone stand by attaching it to a weighted base. Great for desks with limited mounting space.
Nano Tape

Nano tape gives you a strong, removable bond for mounting your hanger anywhere — under desks, on walls, or on shelves. No screws, no damage.
Mounting Options
Option A: Under‑Desk Mount
- Place hanger near the front edge for easy reach.
- Press firmly for 20 seconds.
- Add a cable clip behind it for clean routing.
Option B: Side‑Mount
- Mount on the side of your desk or shelf.
- Angle slightly upward for better grip.
- Add rubber bumpers if your headset slides.
Option C: Wall‑Mount
- Use full‑coverage nano tape.
- Press firmly against the wall.
- Works best on smooth surfaces.
Option D: Freestanding Base
- Great for desks with limited mounting space.
- Attach the hanger to a weighted base.
- Center it so it doesn’t tip.
Optional Upgrades
- Add a small shelf above it for accessories
- Add LED strip behind the hanger
- Add a cable clip for charging cables
- Add a second hanger for dual‑headset setups
Where This Fits in Your Setup
This hanger works great under your desk, on the side of your setup, next to your monitor, or on a shelf. It keeps your headset clean, accessible, and off your workspace.
Wrap‑Up
A fast, cheap, and clean upgrade that instantly improves your setup. Mount it in minutes — no tools, no drilling, no damage.